內容目錄
前言
在前面的幾篇文章中
我們陸續完成了雞排聯盟API的雛型
那麼
如果我們要新增訂單並以第三方金流結帳的話
要怎麼處理呢?
以下就以歐付寶的API為範例
介紹如何串接歐付寶的信用卡支付API
達成結帳的效果
流程簡介
根據歐付寶官網介紹 https://developers.opay.tw/AioCreditCard/CreateOrder
信用卡金流服務流程如下
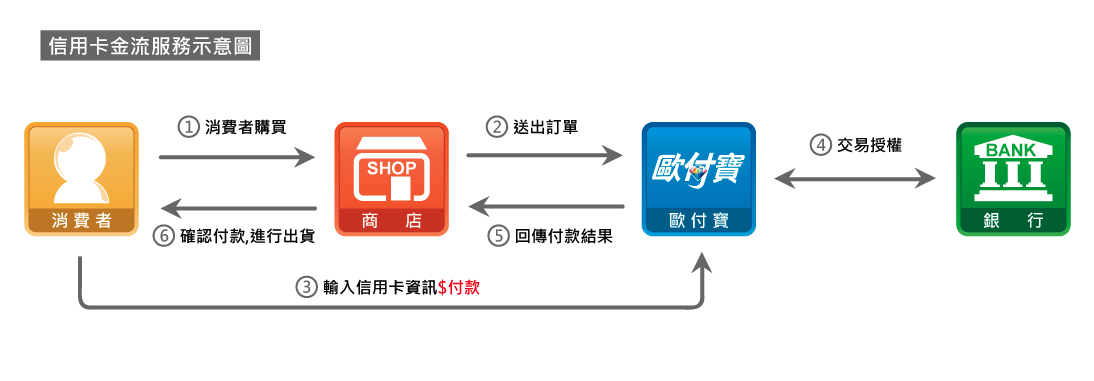
而我的文章的大略流程如下:
- clone 歐付寶SDK (什麼SDK? 參考文章)
並複製到專案資料夾底下 - 建立 Controller 並複製 SDK 內的 example 以串接歐付寶API
- 建立
Orderstable 紀錄交易資料 - 建立前台畫面輸入訂單
- 實際建立訂單以確認流程ok
實作
1. clone 歐付寶SDK,並複製到專案資料夾底下
step 1
clone 歐付寶 SDK URL 如下
https://github.com/o-pay/Payment_PHP
step 2
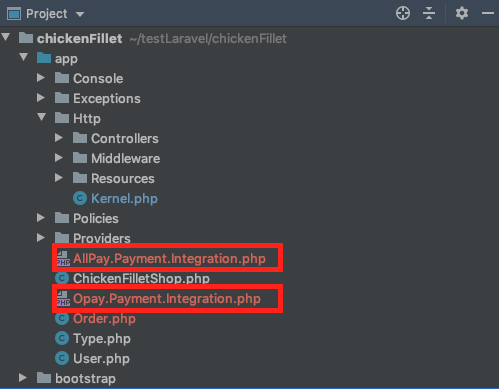
複製到專案資料夾底下
總共有2個
2. 建立 Controller 並複製 SDK 內的 example 以串接歐付寶API
step 1
在 terminal 內下指令建立 controller
php artisan make:controller OpayPaymentsControllerstep 2
複製 example 到我們的 controller 裡
首先是付款
<?php
class OpayPaymentController extends Controller
{
/**
*
*/
    public function pay(Request $request) {

    //載入SDK(路徑可依系統規劃自行調整)
    include('Opay.Payment.Integration.php');
    try {

        $obj = new OpayAllInOne();

        //服務參數
        $obj->ServiceURL  = "https://payment-stage.opay.tw/Cashier/AioCheckOut/V5";         //服務位置
        $obj->HashKey     = '5294y06JbISpM5x9' ;                                            //測試用Hashkey,請自行帶入OPay提供的HashKey
        $obj->HashIV      = 'v77hoKGq4kWxNNIS' ;                                            //測試用HashIV,請自行帶入OPay提供的HashIV
        $obj->MerchantID  = '2000132';                                                      //測試用MerchantID,請自行帶入OPay提供的MerchantID
        $obj->EncryptType = OpayEncryptType::ENC_SHA256;                                    //CheckMacValue加密類型,請固定填入1,使用SHA256加密

        //基本參數(請依系統規劃自行調整)
        $MerchantTradeNo = "Test".time();

        $obj->Send['ReturnURL']         = 'http://localhost/simple_ServerReplyPaymentStatus.php'; //付款完成通知回傳的網址
        $obj->Send['MerchantTradeNo']   = $MerchantTradeNo;                                       //訂單編號
        $obj->Send['MerchantTradeDate'] = date('Y/m/d H:i:s');                                    //交易時間
        $obj->Send['TotalAmount']       = 2000;                                                   //交易金額
        $obj->Send['TradeDesc']         = "good to drink";                                        //交易描述
        $obj->Send['ChoosePayment']     = OpayPaymentMethod::ALL;                                 //付款方式:全功能

        //訂單的商品資料
        array_push($obj->Send['Items'], array('Name' => "歐付寶黑芝麻豆漿", 'Price' => (int)"2000",
                   'Currency' => "元", 'Quantity' => (int) "1", 'URL' => "dedwed"));

        //產生訂單(auto submit至OPay)
        $obj->CheckOut();

    } catch (Exception $e) {
        echo $e->getMessage();
      }
    }
}
?>
接著是接收歐付寶 response 的部份
  public function receive(Request $request) {

    //載入SDK(路徑可依系統規劃自行調整)
    include('Opay.Payment.Integration.php');
    try {

            $obj = new OpayAllInOne();

            /* 服務參數 */
            $obj->HashKey     = '5294y06JbISpM5x9' ;
            $obj->HashIV      =  'v77hoKGq4kWxNNIS' ;
            $obj->MerchantID  = '2000132';
            $obj->EncryptType = OpayEncryptType::ENC_SHA256;

            /* 取得回傳參數 */
            $arFeedback = $obj->CheckOutFeedback();

            // 參數寫入檔案
            if(true)
            {
                $sLog_Path  = __DIR__.'/sample_payment_return.log' ; // LOG路徑
                $sLog = '+++++++++++++++++++++++++++++++++++++++ 接收回傳參數 ' . date('Y-m-d H:i:s') . ' ++++++++++++++++++++++++++++++++++++++++++++' . "\n";
                $fp=fopen($sLog_Path, "a+");
                fputs($fp, $sLog);
                fclose($fp);

                $sLog_File =  print_r($arFeedback, true). "\n";
                $fp=fopen($sLog_Path, "a+");
                fputs($fp, $sLog_File);
                fclose($fp);
            }

            echo '1|OK' ;

    } catch (Exception $e) {
        if(true)
        {
            $sLog_Path  = __DIR__.'/sample_payment_return.log' ; // LOG路徑
            $sLog = '+++++++++++++++++++++++++++++++++++++++ 接收回傳參數(ERROR) ' . date('Y-m-d H:i:s') . ' ++++++++++++++++++++++++++++++++++++++++++++' . "\n";
            $fp=fopen($sLog_Path, "a+");
            fputs($fp, $sLog);
            fclose($fp);

            $sLog_File =  $e->getMessage(). "\n";
            $fp=fopen($sLog_Path, "a+");
            fputs($fp, $sLog_File);
            fclose($fp);
        }
     }
    }
step 3
置換掉include
因為後面會一直include 歐付寶的 SDK 進來
所以這邊一次性置換成 use
首先是刪掉 example 原本的 use
//載入SDK(路徑可依系統規劃自行調整)
include('Opay.Payment.Integration.php');
接著新增AllPay.Payment.Integration.php到composer.json file
"autoload-dev": {
    "psr-4": {
        "Tests\\": "tests/"
    },
    "files": [
        "app/AllPay.Payment.Integration.php" // 新增這個files
    ]
},
ps.
有關PSR-4 Autoloader 機制
可以參考以下文章
http://blog.tonycube.com/2016/09/php-psr-4-autoloader.html
大概就是說我們直接拿composer的autoload來自動載入對應的檔案
所以我們接著在 terminal 下 autoload 指令
composer dump-autoload最後我們在 OpayPayment controller 裡 use 會使用到的 class
<?php
namespace App\Http\Controllers;

use OpayAllInOne;
use OpayEncryptType;
use Exception;
use OpayPaymentMethod;
3. 建立 orders table & Model 紀錄交易資料
這邊我們要用最簡單的方法生成訂單相關的 db table 及 model
以簡單達到兩個目的
1. 能成立訂單

2. 能紀錄訂單是否已付款
step 1
生成
orders table我們將使用 migration
在 terminal 內下指令
php artisan make:model Order -mc- m: 預產生migration
- c: 預產生controller
step 2
完成 migration 內容
首先到剛剛用指令生成的 migration 裡新增我們要的欄位
class CreateOrdersTable extends Migration
{
    /**
     * Run the migrations.
     *
     * @return void
     */
    public function up()
    {
        Schema::create('orders', function (Blueprint $table) {
            $table->increments('id');
            $table->string('name');
            $table->integer('user_id');
            $table->string('shop_name');
            $table->string('item_name');
            $table->string('item_description');
            $table->integer('unit_price');
            $table->integer('quantity');
            $table->integer('total_amount');
            $table->string('merchant_trade_no'); // 預計拿這個訂單編來當作是PK
            $table->boolean('status')->default(false);
            $table->timestamps();
        });
    }

    /**
     * Reverse the migrations.
     *
     * @return void
     */
    public function down()
    {
        Schema::dropIfExists('orders');
    }
}
step 3
執行 migration
php artisan migrate這樣子我們的 orders table 就完成了

step 4
完成 Order model
簡單寫兩個方法在裡面
分別是
1. 成立訂單
2. 在付款完成後將status改為1(付款完)
code 如下
<?php

namespace App;

use Illuminate\Database\Eloquent\Model;

class Order extends Model
{
    /**
     * The attributes that are mass assignable.
     *
     * @var array
     */

    public static function createOrder($item) {
        $order = new Order();
        $order->name = $item['order_name'];
        $order->user_id = $item['user_id'];
        $order->shop_name = $item['shop_name'];
        $order->item_name = $item['product_name'];
        $order->item_description = isset($item['description']) ? $item['description'] : '';
        $order->unit_price = $item['price'];
        $order->quantity = $item['qty'];
        $order->total_amount = $item['price'] * $item['qty'];
        $order->merchant_trade_no = $item['merchant_trade_no'];
        $order->save();
        return $order;
    }

    public static function updateOrderStatus($merchant_trade_no) {
        $order = Order::where('merchant_trade_no', $merchant_trade_no)->update(['status' => 1]);
        return $order;
    }
}
4. 建立前台畫面輸入訂單
在前面的文章中我們已經做好註冊/登入功能
所以這邊我們就直接把登入後的id 給存到 session 裡
讓後續建訂單時可以存到 db
step 1
在 laravel 預設的
welcome.blade.php 新增一個連結到下訂單處同時把
user_id 給存入 session
<div class="links">
    <a href="{{ url('/OpayPayment/') }}">雞排下單連結</a>
    <a href="https://github.com/BenmrChen/" TARGET="_blank">GitHub</a>
    <?php
        if (isset(\Illuminate\Support\Facades\Auth::user()->id)) {
            session()->put('user_id', \Illuminate\Support\Facades\Auth::user()->id);
        }
    ?>
</div>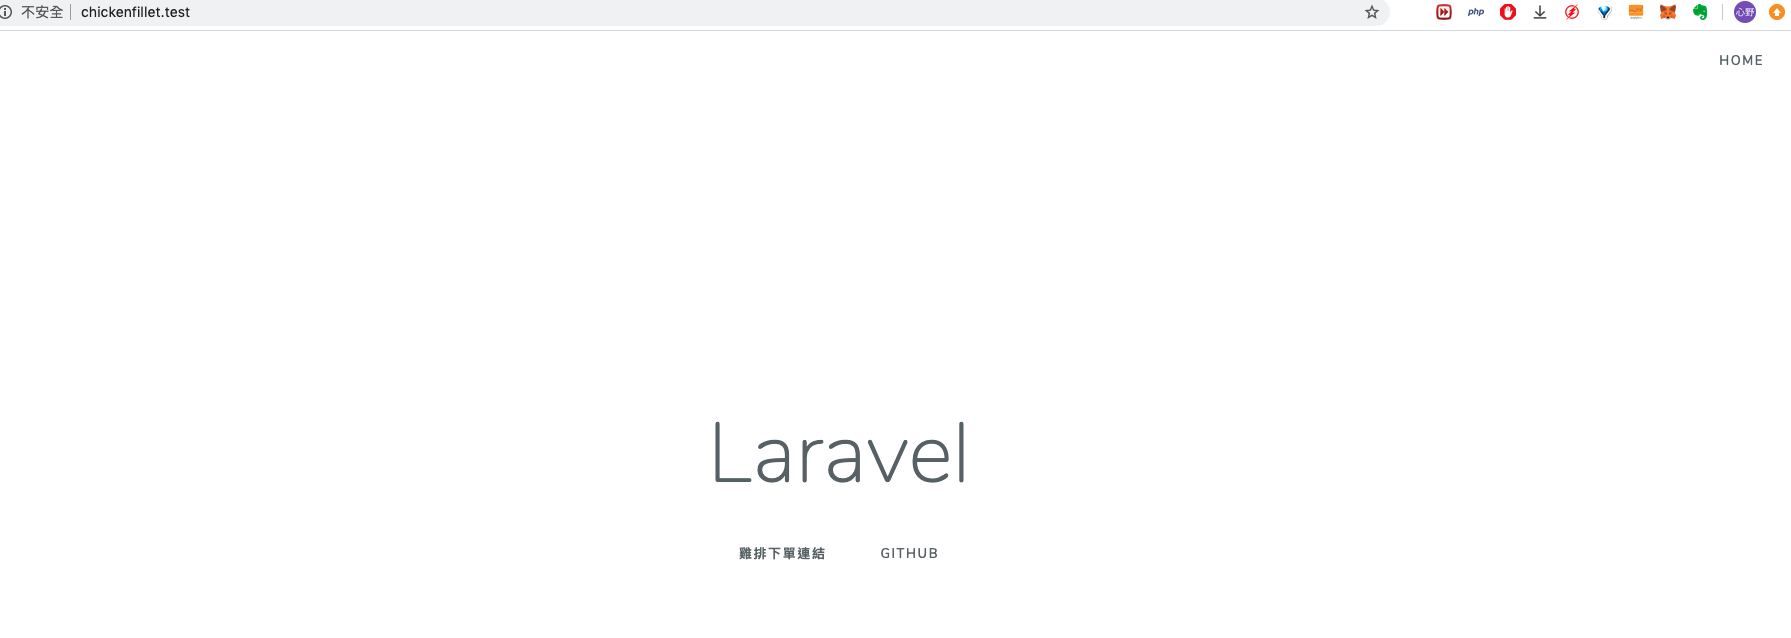
step 2
新增 route
在
web.php 內
Route::get('OpayPayment', function () {
    return view('OpayPayment');
});
在 api.php 內
Route::post('pay', 'OpayPaymentController@pay');
Route::post('receive', 'OpayPaymentController@receive');
step 3
簡單生成一個下單頁面
<!DOCTYPE html>
<html>
<head>
    <title>OpayPayment Exercise</title>
    <meta charset="UTF-8">
</head>
<body>
<form method="POST" action="/api/pay">
    @csrf
    <p>店舖名:
        <select name="shop_name" id="">
            <option value="TW_No_1">台灣第一家雞排</option>
            <option value="World_No_1">世界第一家雞排</option>
        </select>
    </p>
    <p>雞排種類:
        <select name="product_name" id="">
            <option name="chrispy" value="脆皮雞排">脆皮雞排</option>
            <option name="traditional" value="傳統雞排">傳統雞排</option>
        </select>
    </p>
    <p>數量:
        <select name="qty" id="">
            <option value="1">1</option>
            <option value="2">2</option>
            <option value="3">3</option>
            <option value="4">4</option>
            <option value="5">5</option>
        </select>
    </p>
    <input type="hidden" value="http://547776ad.ngrok.io" name="ClintBackURL">
    <input type="hidden" value="<?php echo
step 4
修改複製過到 controller 的 example
好讓 sdk 可以收到前台傳來的資料做結帳
下面要特別注意的點是
ReturnURL 是設定要讓歐付寶傳值回來的 URL由於我是用 valet 當作 local 開發環境
所以可以直接在 command line 下
valet share就會產生 https://b30097bf.ngrok.io 這個url 讓外部ip連
所以請不要跟我用一樣的 url 喔
更多 share 相關可以看官網說明
https://laravel.com/docs/5.8/valet#sharing-sites
 public function pay(Request $request) {
        $MerchantTradeNo = "Test".time();
        // 存入訂單資料
        $item['user_id'] = $request->input('user_id');
        $item['shop_name'] = $request->input('shop_name');
        $item['product_name'] = $request->input('product_name');
        $item['qty']  = $request->input('qty');
        $item['price'] = 65;
        $item['order_name'] = 'test_order';
        $item['merchant_trade_no'] = $MerchantTradeNo;
        $order = Order::createOrder($item);

        $price = 65;
        $qty   = $request->input('qty');
        $name  = $request->input('product_name');

        try {

            $obj = new OpayAllInOne();

            //服務參數
            $obj->ServiceURL  = "https://payment-stage.opay.tw/Cashier/AioCheckOut/V5";         //服務位置
            $obj->HashKey     = '5294y06JbISpM5x9' ;                                            //測試用Hashkey,請自行帶入OPay提供的HashKey
            $obj->HashIV      = 'v77hoKGq4kWxNNIS' ;                                            //測試用HashIV,請自行帶入OPay提供的HashIV
            $obj->MerchantID  = '2000132';                                                      //測試用MerchantID,請自行帶入OPay提供的MerchantID
            $obj->EncryptType = OpayEncryptType::ENC_SHA256;                                    //CheckMacValue加密類型,請固定填入1,使用SHA256加密

            $obj->Send['ReturnURL']         = 'https://b30097bf.ngrok.io/api/receive'; //付款完成通知回傳的網址
            $obj->Send['MerchantTradeNo']   = $MerchantTradeNo;                                       //訂單編號
            $obj->Send['MerchantTradeDate'] = date('Y/m/d H:i:s');                                    //交易時間
            $obj->Send['TotalAmount']       = $price * $qty;                                                   //交易金額
            $obj->Send['TradeDesc']         = "Hen好吃,史勾以!";                                        //交易描述
            $obj->Send['ChoosePayment']     = OpayPaymentMethod::ALL;                                 //付款方式:全功能

            //訂單的商品資料
            array_push($obj->Send['Items'], array('Name' => $name, 'Price' => (int)$price,
                'Currency' => "元", 'Quantity' => (int) $qty, 'URL' => ""));

            //產生訂單(auto submit至OPay)
            $obj->CheckOut();

        } catch (Exception $e) {
            echo $e->getMessage();
        }
    }
同時也修改 receive
在確認到歐付寶傳回來的 response
確認裡頭的 CheckMacValue 和我們這邊 server 生成的一致之後
再去把 order status 改成 1
public function receive(Request $request) {

        try {

            $obj = new OpayAllInOne();

            /* 服務參數 */
            $obj->HashKey     = '5294y06JbISpM5x9' ;
            $obj->HashIV      =  'v77hoKGq4kWxNNIS' ;
            $obj->MerchantID  = '2000132';
            $obj->EncryptType = OpayEncryptType::ENC_SHA256;

            /* 取得回傳參數 */
           $arFeedback = $obj->CheckOutFeedback();
            // 參數寫入檔案
           if(true)
           {
               $sLog_Path  = __DIR__.'/sample_payment_return.log' ; // LOG路徑
               $sLog = '+++++++++++++++++++++++++++++++++++++++ 接收回傳參數 ' . date('Y-m-d H:i:s') . ' ++++++++++++++++++++++++++++++++++++++++++++' . "\n";
               $fp=fopen($sLog_Path, "a+");
               fputs($fp, $sLog);
               fclose($fp);
               Log::info($sLog);

               $sLog_File =  print_r($arFeedback, true). "\n";
               $fp=fopen($sLog_Path, "a+");
               fputs($fp, $sLog_File);
               fclose($fp);
           }
            echo '1|OK' ;
            $MerchantTradeNo = $request['MerchantTradeNo']; // 取得MerchantTradeNo 當作是PK去更更新 order status
            $status = Order::updateOrderStatus($MerchantTradeNo);

        } catch (Exception $e) {
            if(true)
            {
                $sLog_Path  = __DIR__.'/sample_payment_return.log' ; // LOG路徑
                $sLog = '+++++++++++++++++++++++++++++++++++++++ 接收回傳參數(ERROR) ' . date('Y-m-d H:i:s') . ' ++++++++++++++++++++++++++++++++++++++++++++' . "\n";
                $fp=fopen($sLog_Path, "a+");
                fputs($fp, $sLog);
                fclose($fp);
                Log::info($sLog);

                $sLog_File =  $e->getMessage(). "\n";
                $fp=fopen($sLog_Path, "a+");
                fputs($fp, $sLog_File);
                fclose($fp);
            }
        }
    }
5. 實際建立訂單以確認流程ok
step 1
進入首頁 並點右上右登入 點選進入下單頁面
step 2
進入下單面後確認訂單 submit
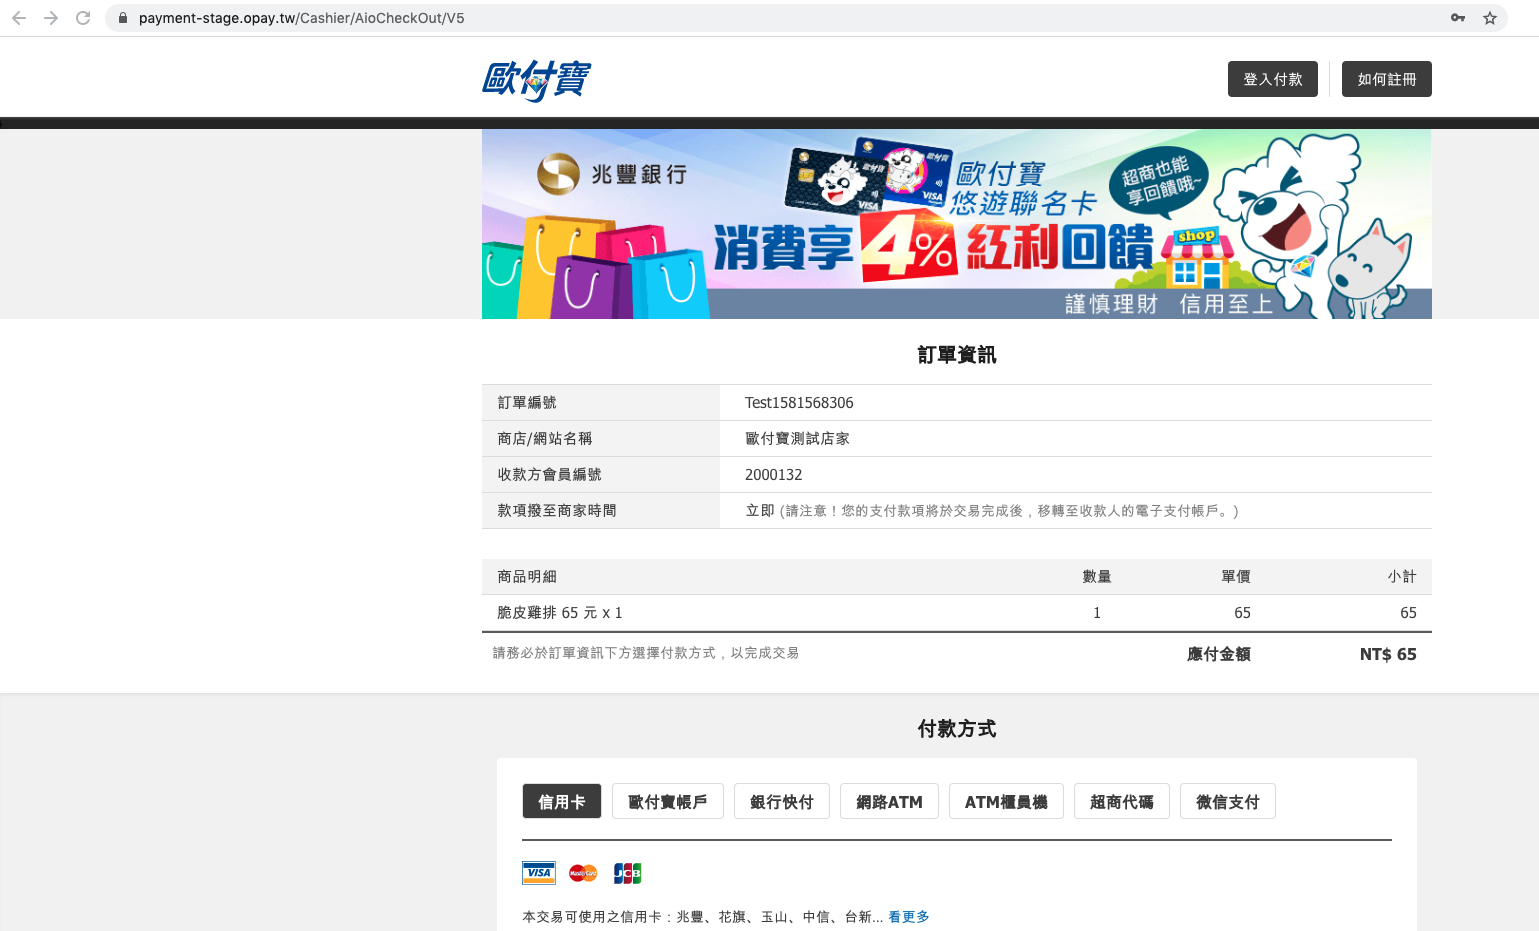
step 3
此時會導入歐付寶的頁面 裡面會有剛剛點選的雞排訂單
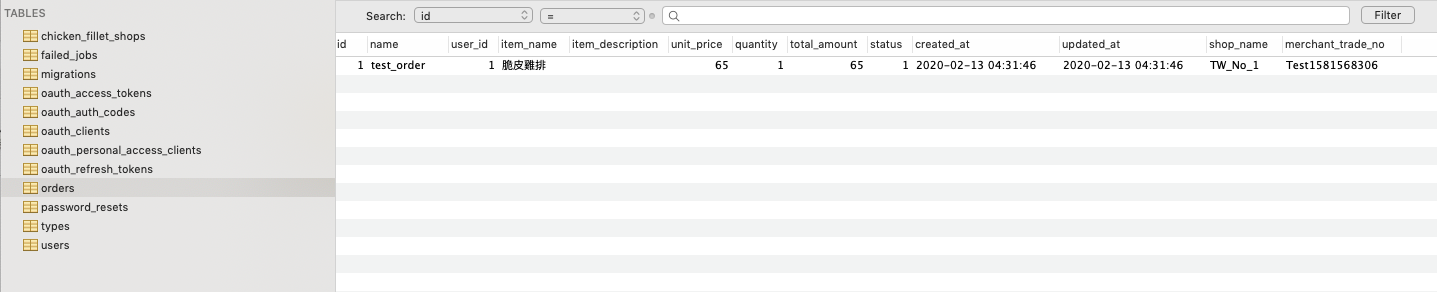
同時check 一下 db
裡頭有剛剛新建的訂單
可以發現
1. status = 0 ,代表還未付款
2. merchant_trade_no 是剛剛生成的 當作是PK
(其實應該是要建關聯db 但這邊就當測試就好 直接用)
step 4
登入並輸入信用卡
可以參考官網的介紹
https://developers.opay.tw/AioCreditCard/CreateOrder
step 5
完成訂單!
我們會收到以下畫面
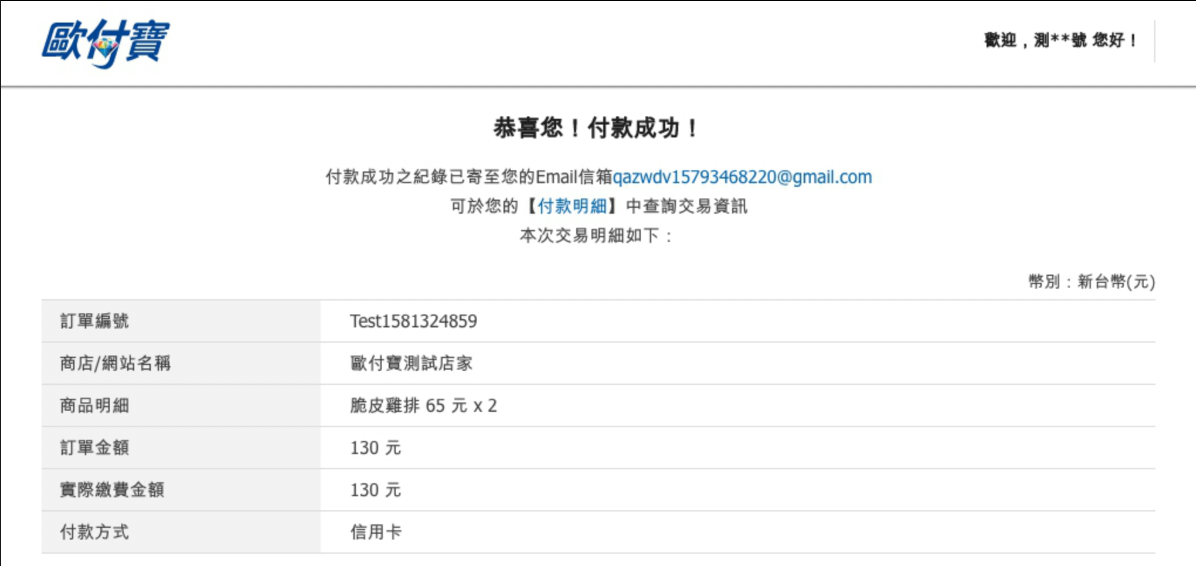
同時再check一下db
hen 好! status = 1 ,代表已完成信用卡支付
讚! 完成!
系列文章
最後附上系列文章
- PHP + Laravel 雞排聯盟API實作: 前言
- PHP + Laravel 雞排聯盟API實作: 產出 table 及可供操作的物件
- PHP + Laravel 雞排聯盟API實作: CRUD 增刪改查
- PHP + Laravel 雞排聯盟API實作: 追加會員身份驗證
- PHP + Laravel 雞排聯盟API實作: 串接歐付寶金流API
以及初學時看的書 推薦!
還有gibhub連結
1 comment
Great content! Super high-quality! Keep it up! 🙂